Hi friends,
In this article, I am going to discuss the hand-operated megger working principle, and I will give you some important information about it. So keep reading.
Insulation of any electrical machine is a very important part of the machine. Many times, machines fail due to the failure of insulation. Therefore, it is very necessary to monitor the condition of the insulation.
To do this, the insulation resistance of the machine is measured periodically and compared with values of the same machine recorded previously. If the machine is showing a decrease in insulation resistance in periodic measurements it means, the insulation of the machine is deteriorating and the machine may break down in near future.

Therefore, insulation resistance measurement is a very significant task but it can not be performed by ordinary mutimeters accurately. Because multimeters can measure up to only some mega ohms.
Furthermore, they can mislead many times, because their power source is not capable of supplying current through the insulations. This task can be performed by a Megger insulation tester with good reliability.
The Megger insulation tester is an instrument used for measuring high resistances of the order of mega-ohms and for testing the insulation resistance. There are two types of megger
- Hand operated
- Electronic with test button
An electronic megger is provided by a battery to supply the test current and the test result is shown on the scale.
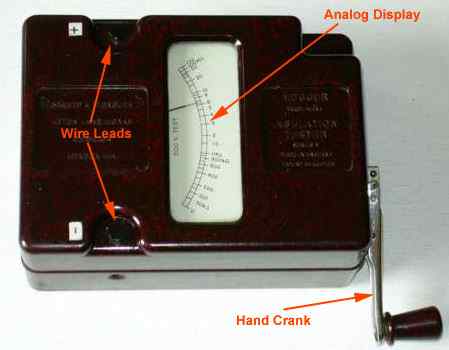
Whereas hand-operated units have an inbuilt DC generator to supply the test current. The instrument generates its EMF when the cranking handle is turned. It has two terminals marked ‘Line’ and ‘Earth’. The crank is turned at a moderate speed till a constant deflection of the needle is obtained.
Hand-operated meggers are less preferred over electronic meggers because they require two persons. One for cranking and the other for testing. Furthermore, accuracy varies with cranking speed.
Megger Working Principle
Megger working principle is based on the working principle of moving-coil instruments, which states that when a current-carrying conductor is placed in a magnetic field, a mechanical force is experienced by it.
The magnitude and direction of this force depend upon the strength and direction of the current and magnetic field.
Construction of Megger
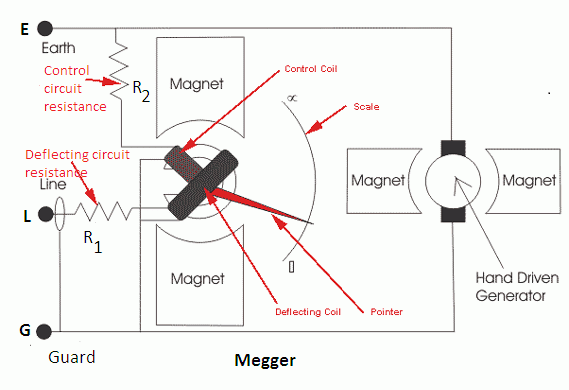
A hand-operated megger consists of a hand-driven DC generator and a direct reading ohm meter. There are two coils PC and CC. Both the coils are fixed together at some angle. They are free to rotate about a common axis between the poles of a permanent magnet. The coils are connected in the circuit through flexible leads (or ligaments), which exert no restoring torque on the moving system.

The current (or deflecting) coil is connected in series with a resistance R1 between the generator terminal and the test line terminal. The deflecting circuit resistance R1 limits the current and controls the range of the instrument. The pressure (or control) coil is connected across the generator terminals in series with a compensating coil and protection resistance (or control circuit resistance) R2.
Compensating coil is connected to obtain better scale proportions. A guard ring is provided to shunt leakage current over the test terminals or within the instrument itself. The terminal ‘G’ known as the guard terminal is provided by means of which the guard ring can be connected to a guard wire on the insulation under test. The test voltage generated by the generator is usually 250, 500, or 1000 volts.
A Megger of 250 volts is used for medium voltage appliances and a megger of higher voltage like 1 KV, 2.5 KV, etc. for high voltage appliances. The test leads or prongs should have proper insulation and should be handled with care to avoid shock.
Megger Working
Before making connections, the two leads should be touched together, and the crank handle turned gently at a slow speed the pointer should indicate zero resistance. Paint, enamel, dirt, etc. should be removed from the surface where the ‘earth’ terminal of the megger is connected.
The resistance under test is connected between test terminals (L and G) the generator handle is then steadily turned at a uniform speed till the pointer gives a steady reading. The working of a megger insulation tester can be fully understood from the following steps:
1. When the test terminals are open, the resistance to be measured is infinite. In case the generator handle is rotated, the generated voltage sends current through the potential coil, and no current flows in the current coil. Therefore, the moving system rotates in such a direction that the pointer rests at the ‘infinity’ end of the scale.
2. If the test terminals are short-circuited, and the generator is operated, it sends a large current through the current coil, and a very small current flows through the potential coil. Therefore, the resultant torque so produced turns the pointer to the ‘zero’ end of the scale.
3. If the unknown resistance to be measured is connected between test terminals, a considerable amount of current flows in both coils. The actual position taken up by the pointer depends upon the ratio of currents in the two coils i.e., upon the unknown resistance.
Meaning of Zero and Infinity Reading
When a megger is showing zero reading, it means the unknown resistance, which is being measured, has a very low value. If it is showing zero value while measuring insulation resistance, it is an indication of insulation failure or a short circuit.
Whereas, when it is showing an infinity reading, it means the unknown resistance, which is being measured, has a very high value (or open circuit).
Applications of Megger
In addition to measuring insulation resistance, a megger is also used for testing grounds, short circuits, and continuity of conductors.
The insulation resistance of a ground conductor between the conductor and the earth is zero. Similarly, two conductors in a short-circuited condition have zero insulation resistance.
The continuity of a conductor is tested by earthing it at one end and measuring its resistance to the ground at the other end. Zero reading will indicate continuity, while high resistance indicates a ‘break.’
Megger is also used for the identification of wires in a conduit. Each wire is earthed in turn at one end, and the wire that gives zero earth resistance at the other end forms the other end of the wire under test.
Insulation Resistance
Insulation resistance of all the significant electrical appliances should be measured at regular intervals and recorded for comparison purposes as it is a useful guide for knowing their condition.
The insulation resistance depends upon the temperature, moisture, cleanliness, age, test voltage, and duration of its application. For proper comparison, the observations must be made under similar conditions and at regular intervals.
The recommended test voltage is 500 V DC applied for one minute. A lower test voltage may be used in the case of low voltage, dirty, and wet appliances to avoid damage to insulation.
Insulation resistance of Motors
The motors pick up moisture during transit, storage, and idle periods. Therefore before installing any motor, its insulation resistance should be checked, which should not be less than one mega-ohm per KV with a minimum of one mega-ohm when the machine is cold. If the insulation resistance is less, the motor should be dried out before full voltage is applied to it.
Precautions
- Never touch the leads while performing the test.
- Isolate the electrical equipment before the test.
- Connections should be clean and tight.
- manually discharge the circuits after performing the tests before touching them.
- Do not try to test semiconductor devices with a megger.
Thanks for reading about the ‘working principle of megger.’ For more information, visit Wikipedia.
Related Posts
- Construction and Working of Moving Iron Instruments
- Construction and Working of Dynamometer Type Wattmeter
- Construction and Working of Megger
- Construction and Working of Megger Earth Tester
- Construction and Working of Power Factor Meter
- Construction and Working of Resonance Type Frequency Meter
- Construction and Working of Analog Frequency Meter
- Construction and Working of Thermocouple Instruments
- Construction and Working of Lux Meter
- Construction and Working of Electrostatic Voltmeter
Oh man i never understood this principle even when my professor took special class about this topic, but you wrote simple and easy to understand, thank you for this is the best article about megger working principle
This article on the working principle of megger has clarified a concept that I previously struggled to understand, despite my professor’s special class. The simple and straightforward explanations provided have made this complex topic much more accessible. I am grateful for this article, as it is undoubtedly the best resource I have come across on the subject of megger working principles.